Tuesday 31 August 2010

Apple String

my self and Hazel went on a little shopping trip at the weekend and we came across some cheap £1 earrings that were needless to say ugly.

so we set each other a craft challenge :) and here is my go.

using two different fabrics i made apples. after making a pattern i cut out 5 in each colour and stitched them up leaving the top open for stuffing i ran a stitch round the opening so after its been stuffed it will draw in.

once thats done i pushed the needle through from top to bottom to pull it in to give the apple shape.
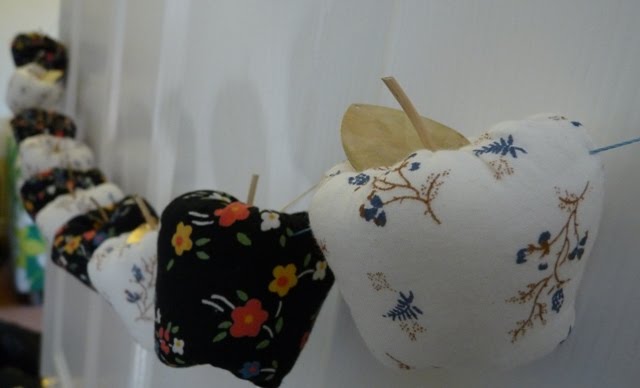
using one of the hearts off the earrings for a leaf and some white willow for a stalk they really look like apples.

once strung together they look great.


Sunday 29 August 2010

Pastel Buttons

well as my pot of buttons is ever growing button collection i thought it was time to start thinning it out, even tho i add 3 more bags of buttons to the collection.

using a wire necklace in i threaded the buttons onto some very thin pink wire and twisted round and round.
i think it gives the desired effect. this is for sale on Folksy. the link is on my page.


Saturday 28 August 2010

New Addition- bar bar bunny

During the week i happen to be donated a large lot of dark brown merino wool fabric.

Merino is one of the softest types of wool available, due to finer fibers and smaller scales and perfect for a little bean bag bar bar bunny.

he is really simple to make, i first stitched on his little face with some bright green thread,
i then stitched up some sausage shapes for big floppy ears.

i stitched them on the first then stitched up the rest of the body, remembering to leave the fill hole.
i then turned him inside out and quarter filled him with stuffing and the rest with split peas.

stitched him up and here he his Bar Bar Bunny.


Thursday 26 August 2010

Ring of Love

had a good crafting session today and made a willow wreath.

this does take a little prep but so do all crafts :)

here is my step by step guide.

  •   cut about 15 of the long, slender branches, each twice as long as you want the wreath to measure around
  • Bend one branch to make a circle of the right size. Wrap the long end of the branch around itself, spiraling around the circle. Add more branches, and continue the spiral. 
  • Lay each new spiral alongside the old one. Keep going until you have used up all the branches you cut.
  • Tie string around the wreath in four places to hold the branches in place. Set the wreath aside to dry.
  • When dry, cut off the string and wrap the wreath.
  • Then decorate. i used some pretty red beads and a big heart bead.


  • Using the hand pruners, cut the pussy willow branches into short lengths, making sure that each one is slightly different in length.

  • Starting at the bottom center of the grapevine or twig wreath, insert each of the cut pussy willow stems into the wreath starting.

  • Work your way up one side and then repeat on the other.

  • Create a thin layer around the entire wreath and then, for more fullness, add the rest of your pussy willow stems into both sides of the wreath.

  • Continue adding the cut stems until you are satisfied that the wreath looks just right. Remember that wreath-making is similar to flower arranging in that symmetry and simplicity go a long way.

  • Once the circle is complete, add a ribbon to the top of the wreath as a hanging loop.

  • You can hang the wreath on your front door or any blank wall space that could use a bit of decoration.

  • Tuesday 24 August 2010

    Blind

    in my house most windows are covered with virtical blinds and i think they are ugly !
    and the one in the kitchen makes to room so small and pokey.
    so yet again i took it upon my self to bring the room to life.

    with my 20p bit of fabric i got from the carboot i measured the window and cut the fabric to size and measured out my lining,

     i added a plate in the blind to give it that roman blind feel. then all there was left to do was stitch the top and hang it.


    Sunday 22 August 2010

    Diamonds

    after being inspired by Hazel with her suspects i had a little go at crayon moulding myself.

    i found a super cute mould from ebay and its lots of diamonds in a tray form.
    its really easy to do i just broke up the crayons to fit into a foil cake cases set the oven to 200c.
    once the oven is hot enough put the cases in the oven till the crayons have melted.

    once melted take out the oven and bend the rim of the case to make a spout and pour into your mould.
    put in the fridge to cool and this is my end result :)

    Wednesday 18 August 2010

    Leaf Green

    after the opening of the oh so ace paperchase in my home town of Lincoln i couldn't resist a trip down to flex the plastic.
    one of my buyings was this beautiful green leaf fibre A3 paper sheet and it is crazy cool. it has real leaf skeletons layed on the paper.


    i have a few ideas for the paper but this is my first go with it using one of the frames that were donated :)

    i layed the paper flat and placed the frame on top and i used PVA glue one the face of the frame to hold it down.
    i cut a line from point to point on the inside of the frame and folded it in a glued it to the inner side.
    i did the same to the outer edge of the frame.


    once dry i used green buttons glued to the frame as dettail and a little silver heart made out of wire in the coner. its cute and qurky.

    Tuesday 17 August 2010

    Love Beads

    today i have been feeling a wee bit pretty and cute so i made something with my buyings from Sunday.
    armed with some pliers and my little bags for red beads i set to work

    just a 5min making session which look supa cute and really effective

    the selection of beads where dark red, foil red and red hearts and they all came from the bead gallery at as little as a penny each, i also got the clasp and wire from there too and was made for well under £2.

    hope you all like :)


    also my little ebay post lady came today with my alphabet rubber stamp set :) cant wait to try them out.

    Monday 16 August 2010

    My Etsy Wish List

    after having a look around all the nice craft blogs on the net at all the cool and pretty things people have been making i came across this amazing giveaway...

    Love For The List Link <<<<<<<

    its such an amazing giveaway i must share it with you all :)
    my wish list includes my love for crafty not just treating myself  but i cant resist cute things and cant forget to put something down for my Stu  x x :)

    here are the links to my wish list items

    Floppy disk box night light $14.95
    this is what i picked out for my Stu to say thanx for all his help with my crafting 

    FOUR Fabric Covered Buttons - Apple Trees $3.60
    i would use these for a cushion

    Mold / Mould - Flexible Heart with Wing Mold $5.45
    i would use this for making necklaces and key chains

    6 Sets Antique Brass Base metal Toggle Clasps-Heart and Arrow $1.45
    for making bracelets

    12 Star Wooden Buttons $1.75
    i would use these for frame work and detailing

    CUTE KAWAII SUN FLOWER $7.90
    this is what i would make the cushion with

    Felt Fabric - 86 Colors Collection 20cm x 20cm Square $40.00
    i could make sooo much with this from animals to hair slides

    Mustache Shaving Cup $22.00
    and this would be for me i loves the tash

    the total is $97.10

    thanx for taking the time to read my wish list and for checking out my blog

    lets hope wishes come true :)

    Green Love

    after a crazy day on Sunday with Hazel, digging through boxes and getting crazy bargins i did some easy crafting with one of my finds.
    it was £2.00 and just the right colour for my living room.

    as you can see its just a string of hessian hearts in soft green shades on a clear string.
    this was such an easy craft, i just pulled out the string because it went from top to bottom, which i didn't want.

    i rearranged the hearts how i wanted them and re threaded them and here is my new string of green hearts

    Sunday 15 August 2010

    Shopping Trip

    today me and Hazel went to a little place called hemswell market, well to be fair is isn't little, its massive!!!
    we arrived around 8.20 am which is mega early for some.

    with a bacon sarni down us we started the search for things to reuse and craft with.
    the place was full of all sorts of goodies and treasures.

    we walked round the whole site from top to bottom and we was proper pooped when we came to the end.
    i got some awesome things as you can see below.


    deffo want to do some more shopping with hazel was great fun and laugh and have loads to show for it.

    Saturday 14 August 2010

    Button, Button, Whos got the Button ?

    while on my lil adventure in good old Lincoln town we have an amazing shop called the bead gallery.
    im not gonna lie, i spent well over 30mins just looking and picking out buttons


    i mainly picked out blues but i did get a few other colours for other projects,
    but you can fill a bag of buttons to the very top for £2 and the buttons i got were ace.

    i also got a coated wire necklace and 0.40mm silver plated copper wire.


    this is where it gets tricky, i cut a length of wire and placed the button that i wanted in the middle of my necklace on the centre of the wire and twisted the wire around the necklace to space it out ready for the next button.


    i worked my way from the middle out one side at a time till i used my buttons up.
    i love the result, its a really nice way to make a special piece of jewellery.

    Noughts & Crosses

    when ever i take a walk into town i always go into the charity shops to see what 2nd hand delights they have.
    today my Stu found a 3D noughts and crosses game and asked if i could make something out of it .....


    to be honest this is a mega easy craft but its really good because it cant be replicated that easy as the "beads" are from a game not a shop.

    i threaded the beads on some thick clear elastic, and i was able to make 2 bracelets out of all the beads from the game.


    i just tied the elastic when it was full and tried it on and this was the result, really nice chunky wood one off bracelet .

    Friday 13 August 2010

    Picture This

    Thanx to a donation of 3 mega cheap picture frames from my cousin Stacey, i couldn't resist in having a make.
    the frames can be used either portrait or landscape which is nice.


    there are so many things to do with these and this is how i started.
    i covered one in faux suede and stapled it on the back and then did the same on the inner.


    i think the texture really adds to the overall feel of it but is its too plain.
    so as stars are my fav i to some gold and silver stars and used PVA glue to stick them down with.


    i didn't want to over do it with the stars so i just added some accent stars in the corner for detail.
    the light catches the stars really well .

    Thursday 12 August 2010

    Finger Tash Gloves

    Finger tashing has become a bit of a craze with myself and friends.
    Im not gonna lie it is abit of a strange thing to do really and this is how its done.....
    when a friend or family is ready in waiting for their photograph to be taken you quick but effortlessly side your finger under their nose to make what is called "a finger tash"

    but now the weather will soon be getting cold and the tashing will come to an end as it will be way to chilly to remove your hands from your oh so snuggley pockets.
    so to tash it up big style and still keep your hands all snug i made these finger tash gloves.

    all you need is one pair of gloves in any colour but try and stay away from black as the tash wont stand out very well, the gloves were uber cheap as the weather is still warm so the winter gear isnt too sort after.

    i cut out a tash from some black felt and stitched it to the inner end of the index finger and here is the end result, modelled by the oh so sexy Stu :)

    Wednesday 11 August 2010

    A picture to remember

    I love taking pictures and saving them and putting them in funny frames around my house for all my family and friends to see when they come to visit.

    i do like to edit alot of my pictures using Photoshop CS4, changing the colours and styles and using cut outs,
    but when my cousin Stacey and her other half Adam got married i wanted to make them something really special.

    i picked a photo that i had taken from the wedding day and had it made up as a canvas which to some is special in its self but i wanted different.
    After a quick look on good old Ebay i found some little cute doves and some flat back pearl hearts.


    Also using a pot of glitter and PVA glue mixed with water i brushed the glitter over the surrounding edge of the canvas and parts of the picture. once dry it looked really eye catching.

    Using the doves and pearls i stuck them down around the canvas and one pearl heart on the detail of the wedding dress. this is the end result. they both loved the canvas and it gives a personal twist.

    Teddys Picnic

    Finding my bear collection ever growing, its seems my house is turning into a teddy bears picnic.
    so to give them a new look i thorght dressing all the bears up in fancy dress would be fun.

    All the bears are from the mumbles range, all the same size and shape.
    The bears name is Bracken, he comes with a little bow tie that is cute but i prefer to cut it off.


    The fancy dress of the bears will be an on going thing. i have only done one bear so far,
    and yes it had to be a pirate, with his cut shirt and eye patch i dont think he looks too bad.


    heres hoping that the other Bracken bears will look a little more fancy,

    Monday 9 August 2010

    Meow the cat

    I started seeing strange animals/ none discript creatures all over and i felt the need to design my own but with a lil drawing from Stu this was born.
    Using any thing that looked funky for fabric from handbags to old canvas shoes.
    Made from 5 single patterns its mega easy to make. 

    • 2 body pannels
    • 6 arm pannels
    • 4 leg pannels
    • 4 ear pannels
    • 1 eye 

    The extra arm pannels are for the tail.
    I stitched all the outer limbs first then postioned ready for the final stitch round the body but leaving a gap for turning and stuffing, then hand stitch up the hole.