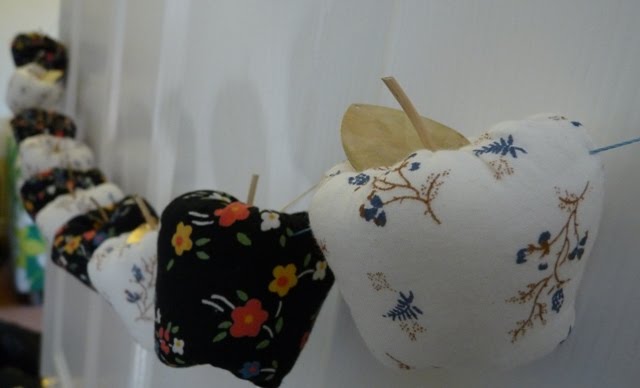
my self and Hazel went on a little shopping trip at the weekend and we came across some cheap £1 earrings that were needless to say ugly.
so we set each other a craft challenge :) and here is my go.
using two different fabrics i made apples. after making a pattern i cut out 5 in each colour and stitched them up leaving the top open for stuffing i ran a stitch round the opening so after its been stuffed it will draw in.
once thats done i pushed the needle through from top to bottom to pull it in to give the apple shape.
using one of the hearts off the earrings for a leaf and some white willow for a stalk they really look like apples.
once strung together they look great.
Tuesday, 31 August 2010
Sunday, 29 August 2010
Pastel Buttons
well as my pot of buttons is ever growing button collection i thought it was time to start thinning it out, even tho i add 3 more bags of buttons to the collection.
using a wire necklace in i threaded the buttons onto some very thin pink wire and twisted round and round.
i think it gives the desired effect. this is for sale on Folksy. the link is on my page.
using a wire necklace in i threaded the buttons onto some very thin pink wire and twisted round and round.
i think it gives the desired effect. this is for sale on Folksy. the link is on my page.
Saturday, 28 August 2010
New Addition- bar bar bunny
During the week i happen to be donated a large lot of dark brown merino wool fabric.
Merino is one of the softest types of wool available, due to finer fibers and smaller scales and perfect for a little bean bag bar bar bunny.
he is really simple to make, i first stitched on his little face with some bright green thread,
i then stitched up some sausage shapes for big floppy ears.
i stitched them on the first then stitched up the rest of the body, remembering to leave the fill hole.
i then turned him inside out and quarter filled him with stuffing and the rest with split peas.
stitched him up and here he his Bar Bar Bunny.
Merino is one of the softest types of wool available, due to finer fibers and smaller scales and perfect for a little bean bag bar bar bunny.
he is really simple to make, i first stitched on his little face with some bright green thread,
i then stitched up some sausage shapes for big floppy ears.
i stitched them on the first then stitched up the rest of the body, remembering to leave the fill hole.
i then turned him inside out and quarter filled him with stuffing and the rest with split peas.
stitched him up and here he his Bar Bar Bunny.
Thursday, 26 August 2010
Ring of Love
had a good crafting session today and made a willow wreath.
this does take a little prep but so do all crafts :)
here is my step by step guide.

Using the hand pruners, cut the pussy willow branches into short lengths, making sure that each one is slightly different in length.
Starting at the bottom center of the grapevine or twig wreath, insert each of the cut pussy willow stems into the wreath starting.
Work your way up one side and then repeat on the other.
Create a thin layer around the entire wreath and then, for more fullness, add the rest of your pussy willow stems into both sides of the wreath.
Continue adding the cut stems until you are satisfied that the wreath looks just right. Remember that wreath-making is similar to flower arranging in that symmetry and simplicity go a long way.
Once the circle is complete, add a ribbon to the top of the wreath as a hanging loop.
You can hang the wreath on your front door or any blank wall space that could use a bit of decoration.
Using the hand pruners, cut the pussy willow branches into short lengths, making sure that each one is slightly different in length.
Starting at the bottom center of the grapevine or twig wreath, insert each of the cut pussy willow stems into the wreath starting.
Work your way up one side and then repeat on the other.
Create a thin layer around the entire wreath and then, for more fullness, add the rest of your pussy willow stems into both sides of the wreath.
Continue adding the cut stems until you are satisfied that the wreath looks just right. Remember that wreath-making is similar to flower arranging in that symmetry and simplicity go a long way.
Once the circle is complete, add a ribbon to the top of the wreath as a hanging loop.
You can hang the wreath on your front door or any blank wall space that could use a bit of decoration.
Using the hand pruners, cut the pussy willow branches into short lengths, making sure that each one is slightly different in length.
Starting at the bottom center of the grapevine or twig wreath, insert each of the cut pussy willow stems into the wreath starting.
Work your way up one side and then repeat on the other.
Create a thin layer around the entire wreath and then, for more fullness, add the rest of your pussy willow stems into both sides of the wreath.
Continue adding the cut stems until you are satisfied that the wreath looks just right. Remember that wreath-making is similar to flower arranging in that symmetry and simplicity go a long way.
Once the circle is complete, add a ribbon to the top of the wreath as a hanging loop.
You can hang the wreath on your front door or any blank wall space that could use a bit of decoration.
this does take a little prep but so do all crafts :)
here is my step by step guide.
- cut about 15 of the long, slender branches, each twice as long as you want the wreath to measure around
- Bend one branch to make a circle of the right size. Wrap the long end of the branch around itself, spiraling around the circle. Add more branches, and continue the spiral.
- Lay each new spiral alongside the old one. Keep going until you have used up all the branches you cut.
- Tie string around the wreath in four places to hold the branches in place. Set the wreath aside to dry.
- When dry, cut off the string and wrap the wreath.
- Then decorate. i used some pretty red beads and a big heart bead.
Tuesday, 24 August 2010
Blind
in my house most windows are covered with virtical blinds and i think they are ugly !
and the one in the kitchen makes to room so small and pokey.
so yet again i took it upon my self to bring the room to life.
with my 20p bit of fabric i got from the carboot i measured the window and cut the fabric to size and measured out my lining,
i added a plate in the blind to give it that roman blind feel. then all there was left to do was stitch the top and hang it.
and the one in the kitchen makes to room so small and pokey.
so yet again i took it upon my self to bring the room to life.
with my 20p bit of fabric i got from the carboot i measured the window and cut the fabric to size and measured out my lining,
i added a plate in the blind to give it that roman blind feel. then all there was left to do was stitch the top and hang it.
Sunday, 22 August 2010
Diamonds
after being inspired by Hazel with her suspects i had a little go at crayon moulding myself.
i found a super cute mould from ebay and its lots of diamonds in a tray form.
its really easy to do i just broke up the crayons to fit into a foil cake cases set the oven to 200c.
once the oven is hot enough put the cases in the oven till the crayons have melted.
once melted take out the oven and bend the rim of the case to make a spout and pour into your mould.
put in the fridge to cool and this is my end result :)
i found a super cute mould from ebay and its lots of diamonds in a tray form.
its really easy to do i just broke up the crayons to fit into a foil cake cases set the oven to 200c.
once the oven is hot enough put the cases in the oven till the crayons have melted.
once melted take out the oven and bend the rim of the case to make a spout and pour into your mould.
put in the fridge to cool and this is my end result :)
Wednesday, 18 August 2010
Leaf Green
after the opening of the oh so ace paperchase in my home town of Lincoln i couldn't resist a trip down to flex the plastic.
one of my buyings was this beautiful green leaf fibre A3 paper sheet and it is crazy cool. it has real leaf skeletons layed on the paper.
i have a few ideas for the paper but this is my first go with it using one of the frames that were donated :)
i layed the paper flat and placed the frame on top and i used PVA glue one the face of the frame to hold it down.
i cut a line from point to point on the inside of the frame and folded it in a glued it to the inner side.
i did the same to the outer edge of the frame.
once dry i used green buttons glued to the frame as dettail and a little silver heart made out of wire in the coner. its cute and qurky.
one of my buyings was this beautiful green leaf fibre A3 paper sheet and it is crazy cool. it has real leaf skeletons layed on the paper.
i have a few ideas for the paper but this is my first go with it using one of the frames that were donated :)
i layed the paper flat and placed the frame on top and i used PVA glue one the face of the frame to hold it down.
i cut a line from point to point on the inside of the frame and folded it in a glued it to the inner side.
i did the same to the outer edge of the frame.
once dry i used green buttons glued to the frame as dettail and a little silver heart made out of wire in the coner. its cute and qurky.
Subscribe to:
Posts (Atom)